Must-Have for Handymen! A Deep Dive into 'SUS Sleeve Anchors': How to Install and Best Applications!?
Must-Have for Handymen! A Deep Dive into "SUS Sleeve Anchors": How to Install and Best Applications!?
Hello everyone! Have you ever experienced this... drilling a wall to hang something heavy and feeling terrified it might fall on your head! Or maybe you install something outdoors, and after just a bit of rain and sun, "rust eats it up" until the anchor decays and can't hold the weight! These annoying problems will disappear because today we are introducing you to the "top tier" of the fastening world: the Stainless Steel Anchor, or SUS Sleeve Anchor!
Many might wonder, "Hey, regular steel anchors exist, why upgrade to the stainless steel version?" The answer is "god-tier durability"! The term SUS (Stainless Steel) guarantees maximum resistance to rust, sun, rain, and moisture! It is absolutely perfect for our local weather.
Alright, without further ado, let's check out this step-by-step "installation guide" from the manual above. Follow these steps, and I guarantee it'll be "rock-solid with zero slips!"
️ 5 Pro Steps for Sleeve Anchor Installation!
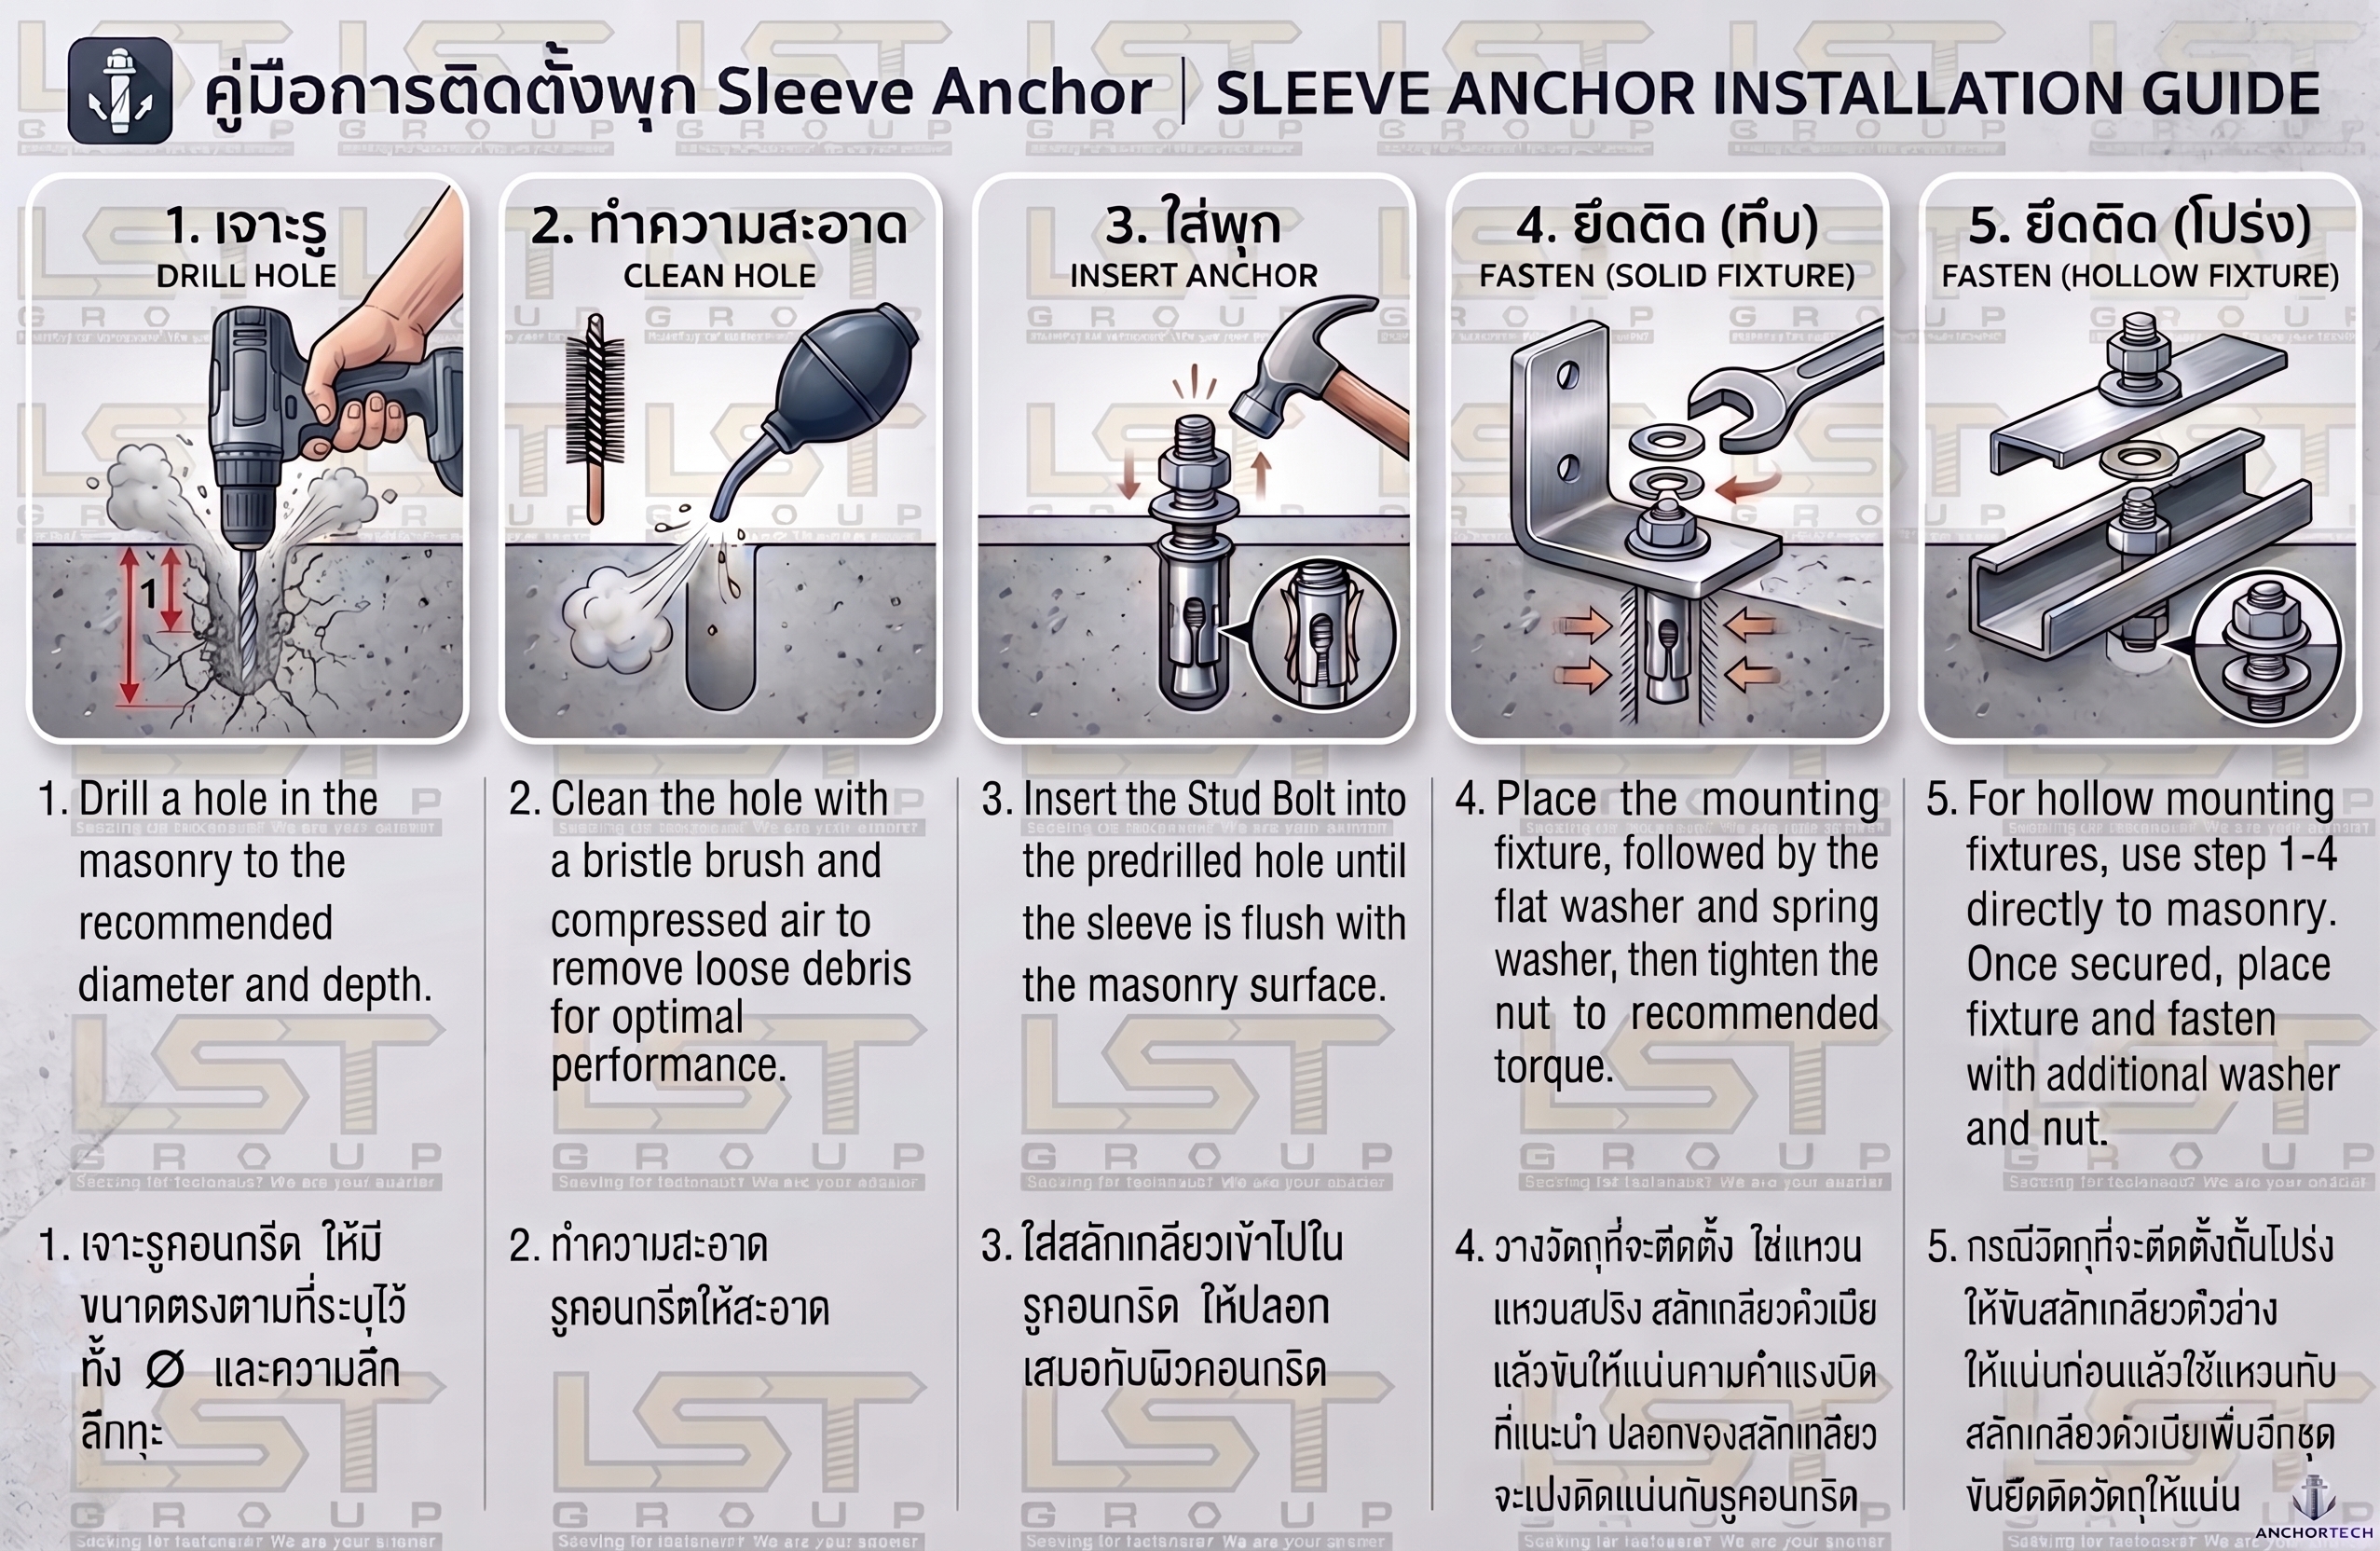
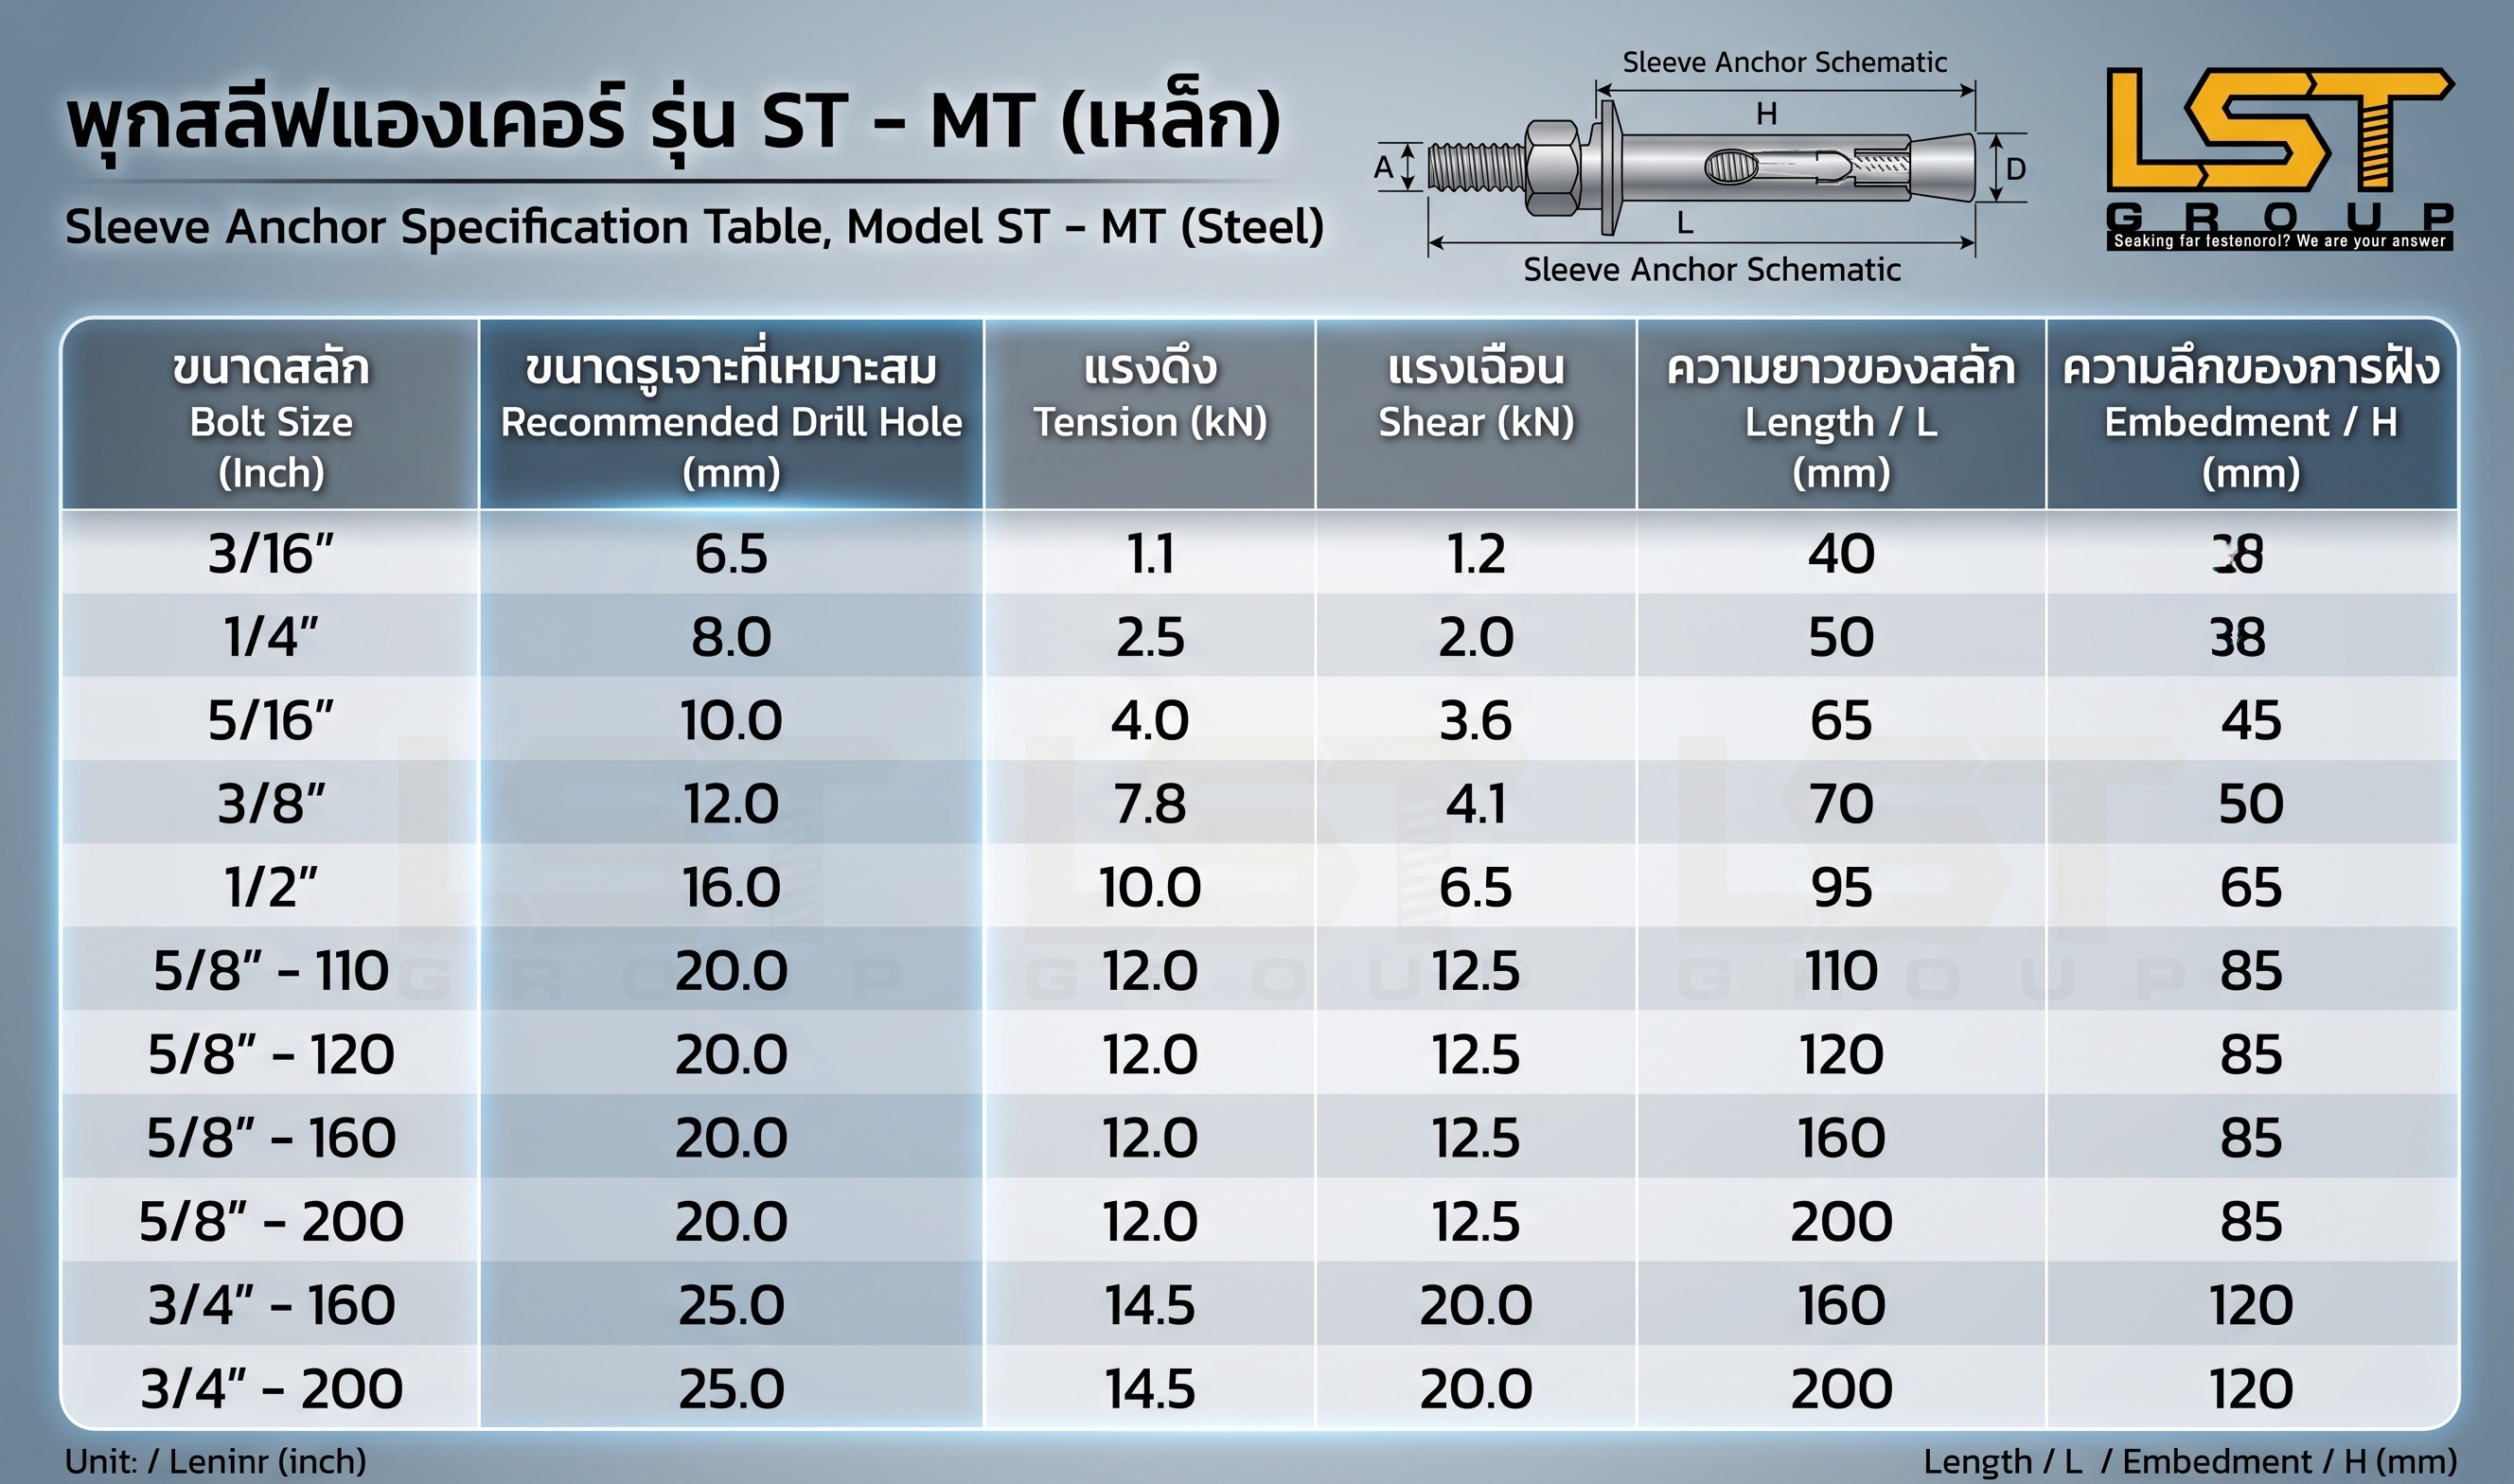
Step 1: Drill Hole - The Foundation of Strength Start by grabbing your trusty drill! Drill a hole into the concrete to the exact "diameter (Ø) and depth" specified for the anchor. Drill it straight and to the proper depth to give the anchor sleeve enough space to fully expand. (Refer to the drilling size recommendations in the table below).
Step 2: Clean Hole - Never Skip This Step! Many people fail right here! Drilling the hole and immediately shoving the anchor in is a huge mistake! Concrete dust in the hole will reduce friction, causing the anchor to hold loosely. We need to use a stiff wire brush to scrub the dust and a blowout bulb (or air compressor) to blow out all the debris completely for the best optimal fastening performance!
Step 3: Insert Anchor Once the hole is squeaky clean, insert the SUS Sleeve Anchor Bolt into the drilled hole. Tap it gently with a hammer to drive the anchor in until the "anchor sleeve is flush with the concrete surface"—not protruding and not sunk too deep.
Step 4: Fasten (Solid Fixture) - Lock it Tight! For solid fixtures (e.g., CCTV brackets, steel plates), place the fixture over the hole first, followed by a "Flat Washer" and a "Spring Washer." Then, use a wrench to tighten the nut to the recommended torque. This is the magic moment... the anchor sleeve inside the concrete will "expand" and grip the concrete wall super tightly!
Step 5: Fasten (Hollow Fixture) - A Special Trick for Hollow Materials But wait! If the fixture you're installing is "hollow" or has a gap in the middle (like a C-channel steel), we have a trick! Follow Steps 1-4 first by tightening the bottom nut to expand the sleeve and lock it securely to the concrete. After that, place the hollow fixture on top, and use "another set" of a washer and nut to lock the fixture tightly from above. This guarantees the fixture won't collapse and is 100% solidly secured!
Where are SUS Sleeve Anchors Best Applied? Are They Worth the Investment?
I can confidently say right here that they are "worth every single penny," especially if used for these applications:
Outdoor Applications: Whether it's an awning frame, solar panels, or an AC compressor, this anchor withstands sun and rain. No need to fear rust eating away until the structure collapses.
Wet Areas: Jobs in the bathroom, water pump installations, or structures near rivers and seas with high moisture and salt mist. Stainless steel is the only surviving answer!
Food and Hospital Industries: Areas demanding the ultimate level of hygiene where rust contamination is strictly prohibited. Stainless steel anchors are the standard you must choose.
Heavy-Duty and High-Vibration Jobs: With a well-designed expansion mechanism combined with tough and durable stainless steel material, it handles tensile force and vibration excellently.
Conclusion : If we understand the tools and choose the right type, paying a little extra for a SUS Sleeve Anchor pays off with safety, long-lasting strong structures, and zero headaches from rust repairs later on. I'm telling you, "This is the ultimate component every handyman needs in their toolbox!"
I hope this article helps you install anchors correctly and safely!
Related Products:
- Steel Sleeve Anchor
- SUS Sleeve Anchor